Seamwork Florence bralette. Part I cutting

Here you see the bones of the Florence, which is one of the patterns that came with the subscription to February’s Seamwork Issue.  I ordered all the materials to make the bralette (sort of a lightweight bra) and for the Geneva, which is the companion underwear pattern.  Here, you can see that I did not need two full yards of lace.  This makes me rather grumpy.

Also, the total yardage for both patterns called for 1.25 yards of stretch satin.  But here, with some creative laying out, I can get four pairs of underwear and material for two bras.  Had I known that, I would have ordered a bit more lace.

See how nicely this pattern piece fits into the bits of space for the underwear?

At that point, I had to leave, so this project went on hold.

Camisole part II (big fail) pattern weights and two napkins.

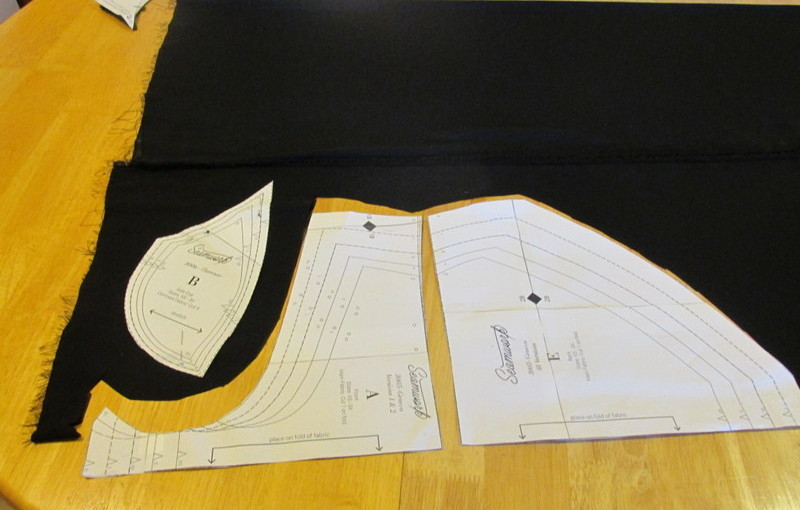
When we last saw the camisole, I was waiting for the arrival of the stretch lace.  It arrived, and last weekend, I attempted to sew it together as was called for in the instructions.  The machine kept jamming and I decided I was not in the space for sewing, and put away the project for the week. 

My brain kept things on the back burner though, and I remembered reading that backing the lace/unstable item with tissue paper might help.  I did this and voila!  It worked!

I then sewed the lace to the camisole.  Note.  This was not the right way to do this.  We’ll talk more about this later.

Straps were attached (wrong, ripped out and reattached) and I noticed the lace sagged instead of standing up and meeting the strap.  So tacked them.

When I tried on the camisole, I found some problems.  First of all, the lace folded up together.  That wasn’t right.

Also, by the time I had adjusted everything to proper height,  the sliders on the straps were all the way to the front of the camisole.  So I ripped out the straps again, shortened them and reattached.

I tacked down the lace on the bottom to encourage it not to roll together and that sort of worked.  But the top stuff flopped over.  So that wasn’t good.

Overall, neither of the camisoles turned out to work for me.  The gapped a bit at the underarms and my bra is so full coverage, I had to wear them really high. And my bra straps still showed, which I have a problem with.  So they’ve been reassigned to the role of pajama tops when the weather gets warmer.  Rather disappointing, but all part of the game.

I hung up the instructions with the camisoles and a few hours later noticed that I put the lace on wrong.  I attached at the mid-point of the lace, but I should have attached at the bottom of the lace.  Sigh.

I did have success in my quest to use up bigger “bits” of leftover material.  I now have three pattern weights.

And two napkins.  So there’s that.

Savannah Camisole Part I (also favorite pattern and my cat is cute)

Before we get to the camisole, Julie and I went to Fabric Depot to purchase material for said camisole.  We always enjoy looking at the sample garments and this one was a winner. The peplum shirt version was on display and, aside from the ruffles around the neckline which both of us wouldn’t bother to add in the first place, we loved this!  I forgot my camera, so this is a blurry cell phone photo. 

Also, before Julie and I went to Fabric Depot (this is a poorly arranged post) I cleaned the house.  After vacuuming my doormat, I needed to mop the floor, so I set the doormat on my bed.  Sentinel decided it was a good place to sit.

The Savannah camisole is one of two patterns available to subscribers of Seamwork magazine’s January issue.  The other one was a pair of leggings with a cute tulip detail.  I just made leggings, so I’m skipping that pattern now.  I do need tops/shirts/etc so I’m making the camisole.  This will be my first project sewing on the bias.

Here, I’ve taped and cut the pattern.

See that diagonal grain-line?  Usually it would be parallel to the center fold.  That’s how you know this is a bias cut.  I also learned that one should cut fronts and backs of bias cut garments so the bias runs in opposite direction.  This keeps the garment from twisting around the body.

Sentinel came to help with the cutting.  The other thing I learned with this project was that one should cut out pieces on a single layer.

This project was advertised as taking two hours and I’m nearly at that mark.  I’m also nearly done.  I just need to attach the stretch lace and the straps.  I did not finish this project because I’d never used stretch lace before, so I did some online research before we went to the fabric store.  This was both good and bad.  Good because I knew how much stretch lace cost online.  Bad because the stretch lace at Fabric Depot was four times the price of the lace online.  I needed two yards, which would have cost $12.00 or more at the store.  So I came home and ordered five yards from a seller on Etsy (who lives in Boise, Idaho) for $6.00 including shipping.

I’m really liking this fabric and pattern so far.  I look forward to finishing this project.

Baby blanket (finally) finished!

The baby in question, MaryAnn’s Henry, is now two months old.  This is the same pattern I used for the other three baby blankets I made.  One for Ariel’s Charlie and Matt’s niece Mya.  I’ve also made it for a friend whose child is now in elementary school.  That was the pre-digital-camera era though, so I don’t have a picture of that one. 

I’m such a slow knitter I usually start these before the couple knows the sex of the child, so green is the default color. I would be fine with giving more girly colors to boys and vice versa, but not everyone feels that way and so gender-neutral green it is.

I’ve also got a PDF of the pattern I can send you if you are interested.  Just let me know. It’s very easy, 3 knits 3 pearls in a repeating pattern of 14 rows. 

Starting with this blanket, I kept track of what I was watching while knitting.  Here’s the list:

  • Wolverine
  • Persuasion (BBC)
  • Midsummer Night’s Dream (Portland Actor’s Ensemble)
  • Revenge of the Nerds
  • In a World
  • Repo Man
  • Ruby Sparks
  • Mad Men Season 7 part I
  • Ladies and Gentlemen, the Fabulous Stains
  • Frozen
  • Sherlock Season 1
  • House of Cards Season 1 (episodes 1-3)
  • Stuck in Love
  • Treme Season 1 (episodes 1-3)
  • Downton Abbey, Season 5 (episodes 1-3)

Circle Skirt part I

Gertie’s New Book for Better Sewing has a schematic to make a circle skirt. I had material left over from the capes I made last summer, so here I go.

I had very little pattern paper, so I made my right angle in one corner.

And then raided the wrapping paper for the rest of the pattern.

Here are my two pattern pieces, the waistband and the skirt.

I moved the chairs out of the way to clean and then left them while I was working on the skirt.  Sentinel found a new seat to sit on.

Sadly, while I had thread and the material, I did not have a zipper, so this is as far as the circle skirt has gotten.

Seamwork Oslo Sweater Part II

Julie came over for a day of sewing and she helped me lay out the material.  So it was speedy, taking us only 10 minutes.  She also got to see first-hand how lazy a sewist I am.  “Aren’t you going to line up that grainline?” she asked at one point.  I shrugged and she adjusted it.

Here we are 90 minutes in and it’s looking like a robe.  The material is this great fabric I got from Rose City Textiles in their bargain room.

This was also the point in which the directions and I became estranged.  The way I was reading the instructions for the cuff ended up not making much sense, so I finally just added the cuff the way I thought it would work.

And done!  I really like it! It’s very soft and cozy and is the perfect length for a robe.

And here is the final tally. Although you have to add the hour I spent taping the pattern.  But I still consider four hours “an afternoon.” Color me happy,  Seamwork.  I also added snaps to the front to keep it closed. Worked great.

Seamwork Oslo Sweater part I

I’ve subscribed to Seamwork, a digital sewing magazine.  The magazine is free, and if you subscribe ($6.00  per month) you receive two patterns each month.  Each pattern is designed so it can be completed “in an afternoon”.  I aim to make the Oslo Cardigan, although I’m going to use it as a robe.  Let’s see if indeed this pattern can be completed in a timely fashion.

Below, Sentinel observes the detritus from too many projects.

The pattern comes in two forms.  A digital file that can be printed at a copy shop, or a file that can be taped together.  I didn’t make it to the copy shop, so taping and cutting I am.  I did this the night before I set to sewing, and forgot to start the timer, but I think the taping and cutting took about an hour.

Four hours and I’m done. The making of Jalie 2920

Modern Domestic was having a sale and I wandered down and came home with a pattern and some fabric.  I’m after leggings that actually are a correct fit.  Ones that don’t bunch up at the ankle. And, with this pattern, if I want to channel my 80s self and make stirrup tights, I now can.  (I do not want to do this, but still.)

Here’s the mini-skirt fabric. I like it because it looks like math and the planets.

Here is my new elevated cutting table.  Those are Ikea bed risers (which sadly, they no longer produce) and the legging material laid out on my table.

There is not enough material.  
I later figured out that I had extended the pattern too far and should have kept it at its original length. So it was fine.
The material itself is this great Eileen Fisher four-way stretch fabric. It feels great and feels like it will last a very long time.  
Cutting out the skirt.  
And the finished product.  
The instructions for the skirt have a typo in them, but I did okay.  Also, I would suggest marking the leggings (I used masking tape and a ball point pen) with which is the back seam and which is the front seam.  Once you sew them together it becomes unclear which is the back and which is the front.  I also sewed a bit of ribbon in the back of both the skirt and the leggings so I could identify the back.

New ironing board. Also, completed shrug.

The old model. Not shown:  how it would shriek while setting it up, causing Antares to flee in horror.  Also not shown:  how it would fall down unexpectedly, sometimes right in the middle of me pressing something.
Our new ironing board friend? Looks cheery. Is manufactured in a way so it will not fall down unexpectedly.  Also has the same kind of legs as the old one, so I can still use the same closet hangers.
Meanwhile, here’s a picture of my completed shrug.  If I make this again I will size up one size (to accommodate my large arms) and extend the front pieces so they meet.  Still, this is fine.  And its very cozy.