Pop Up Project Finished. Capes

I’m visiting Heather in Kansas and she is the mother of two girls.  So I used those blue satin sheets from Goodwill and made capes.  (Don’t worry, I laundered the material before I got to sewing).
The pattern (found online)was a circle skirt, essentially. You cut two circles (four in my case) drafted a Peter Pan collar, sandwiched everything together, sewed, turned, and then stitched around the outside.

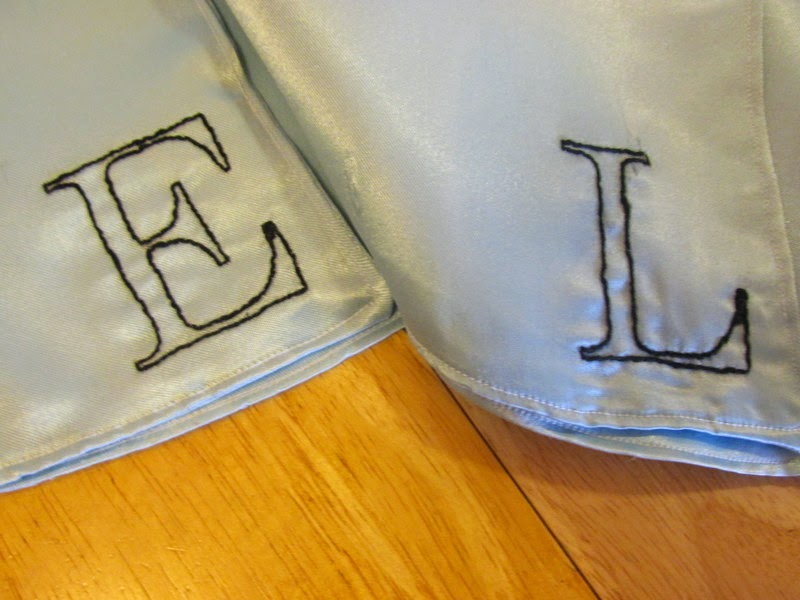
I bought buttons you could cover so they had matching closures and embroidered a monogram in each one.  I’m really happy with how these turned out.

Guess who wants to monogram everything she owns now?  Me! I see where Laverne had the right idea about that particular topic.
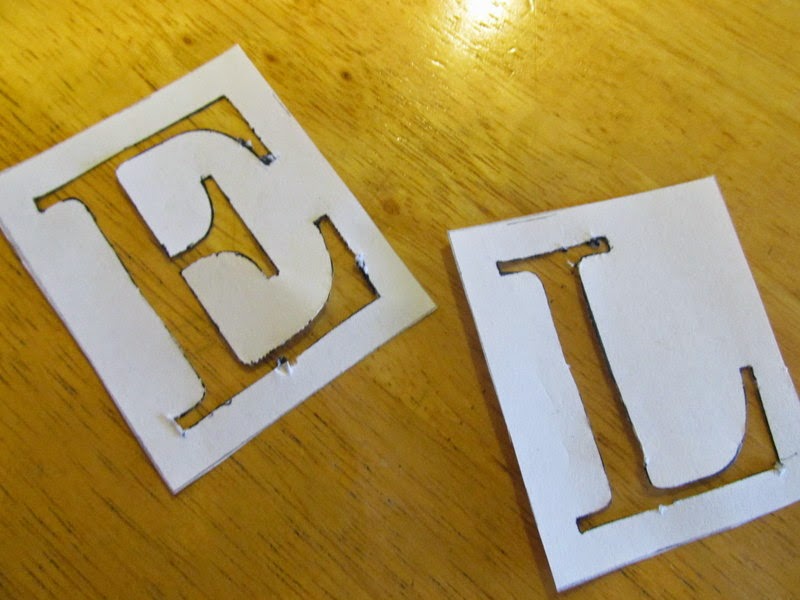
Here are my templates. I found a font I liked, blew up the letters in Word to the right large size, and then printed and sliced out the black part.  
And guess who still has an entire blue satin sheet left?  Did you guess me again?  You are correct.  I have notions of a circle skirt with a monogram.
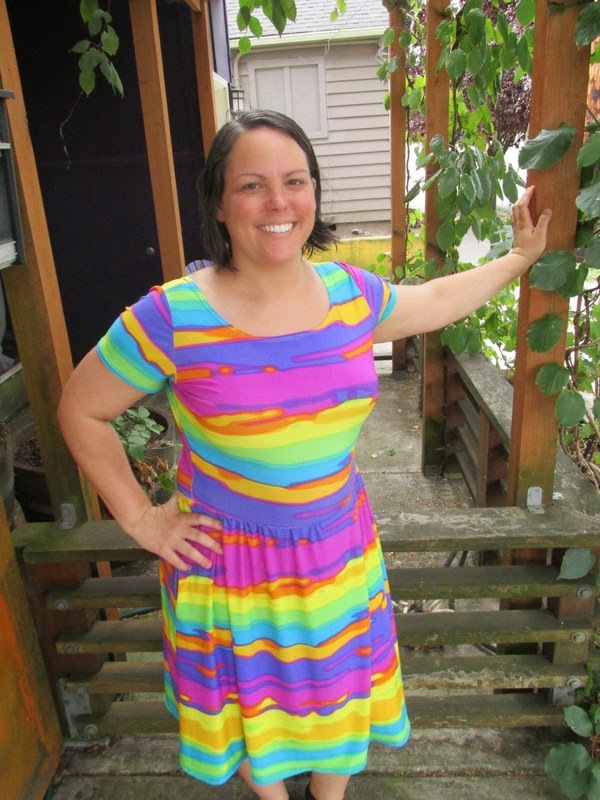
Moneta Dress. Finito!

Man, this was a sewing win.  Big time.

I’m 39 years old with a BMI that puts me in the obese range.  I dress nicely when I am out and about because I think we should all dress nicely when out and about.  Still, after a certain age/weight, a female is pretty much invisible.
Not in this dress. The first day I wore it I got seven compliments.  SEVEN COMPLIMENTS!  From people I encountered along the way, from random passers-by in the street, seven people told me how much they loved this dress.  And I love it too.  The cut and the colors.  And the compliments.

Moneta Work Uniforms. Tricks with the clear elastic, attaching it to the skirt.

I found it helpful to mark the stitching line on the top of the skirt where the elastic will be sewn. It was too hard for me to try and manage stretching elastic and keeping track of where the elastic should be sewn on the fabric.  Drawing in that stitching line gave me a guide for this.
In the Moneta sew along, the instructions are to divide the elastic into five parts.  I think that is fine if you have a relatively small waist, but mine is not and so I had to stretch the elastic over very long distances, which resulted in some uneven elastic attachment in the first dress I made.  So I did the five marks and then found the middle of each of the five segments and marked them.  I found the middle of the official anchoring points and marked them. 

So here we see I have less length to stretch the elastic.  This was quite successful.

I also found it easier to not sew the elastic in a circle before pinning it to the skirt.  Here’s one end here.

Then I just pinned the other end over the first, matching my ending places.  This way I could start at that point and do some firm back stitching to join the circle of elastic right to the skirt.

I have no idea if this is a correct technique, but I found it easiest to stretch my segment out so the elastic pulled tight against the fabric and then plop my fingers down on the sewing machine, keeping the elastic taut.  I then sew until my fingers hit the presser foot and repeated the stretching process.  Because I have more than five points of contact between elastic and skirt, this worked well.

Moneta Work Uniforms. Tricks

Oh, Wonder Tape. I love you so.  My days of fabric slipping around when I try to hem are over!  I used Wonder Tape on all hems in this project: neck, sleeves, skirt.  It’s one of those supplies I might have eschewed back in the day (why do you need this when you can use pins and do without it) but now that I’m an old, jaded sewist, I’ll take anything that makes some regular task easier.

Moneta Work Uniforms. Tricks.

I liked the tip in the Mabel sew along, to mark your pieces with tape while you are sewing, so I did so with this project.  This is telling me this is the front (or possibly back) bodice.  I also marked my center front and center back as it is easier to do that now rather than after the pieces are joined.  Those other lines are just drawing attention to the tabs I’ve cut into the fabric.

The instructions have your join the front and back bodices and the edges of the sleeves and then finish the edges.  I find it so much easier to do BEFORE joining.  This way I’m not serging in the round.

Cutting and marking uniform dresses.

My good technique of what to do with material after you take out out of the dryer, but before you are ready to cut it.

I tried rolling it to preserve the matched selvages.  It was a so-so solution. Sentinel supervises.

Laying out the material.  There are two pieces because I didn’t buy enough the first go-round leaving me nervous for the next few days until I could get back to the fabric store.  Happily, this is a very nondescript fabric, so it was still there.  Also, in the longer strip of material, I have marked a point in the fabric with two clothespins.  This was because I didn’t notice one of those little plastic tag things (the kinds that carry the price tags on most clothing) before I washed and dried this material and said little plastic thing caused a huge snag.  So I had to work around that.  It was fine, though.  I had enough.

I am trying a new marking tool this time:  The Clover Pen.
My review?  Best marking device I’ve come across. And I’ve tried a lot.  It’s full of chalk (you can get blue, yellow and pink, plus refills) and at the bottom is a tiny little wheel which rolls along the fabric and spits out a fine line of chalk.  It would get clogged at times, because of the fabric, but I couple of good taps cleared the clog.  This will become my go-to marking pen for the foreseeable future.

Colette Patterns Moneta: 90% finished!

So fast!  So satisfying!
My main thing I learned with the Mabel and the Moneta is how awesome Wonder Tape is.  Here I have marked where the tape should go.

And here I have affixed the tape. Next I pulled off the top layer, pressed the edge to the tape et voila!  Sleeve hem is held securley in place (no pins!) while I sew the hem.

I’m wasn’t really sure what was going on here.  My guess is that I could have used a bit more ease at the waist (these patterns have negative ease, because of the stretch of the knit fabric).  It also might be a case of my serger not being properly adjusted for tension.  I solved this problem by reinforcing the seam with my regular sewing machine.

Look at this dress!  It still needs a hem, but it came out really well.

Side view. There are pockets!

Closeup of my neckline hemming.  That’s done with a twin needle.  The Wonder Tape, aside from holding the hem in place, also stabilizes it, so it doesn’t stretch.

I made notes of things to remember for the pattern.  I’ve decided to make this year’s uniform dresses with this same pattern, so I’ll go over these notes in the construction of those dresses.

Waiting for a hem.

One thing the dress needs is a tag, or other such thing to indicate which side is the back.  I’ve sewn in a little flower I pulled off my bra during my teenage years.

Colette Patterns Moneta: Cutting and bodice.

Here’s my layout.  I tried to make intelligent decisions about where colors of stripes would fall.  This time I traced around the pattern with a marking pen, then removed the pattern and cut out the materiel. My scissors are so dull!

And here is the bodice. 

They weren’t kidding about it coming together quickly.